Effective Methods to Remove Mould from Pavers

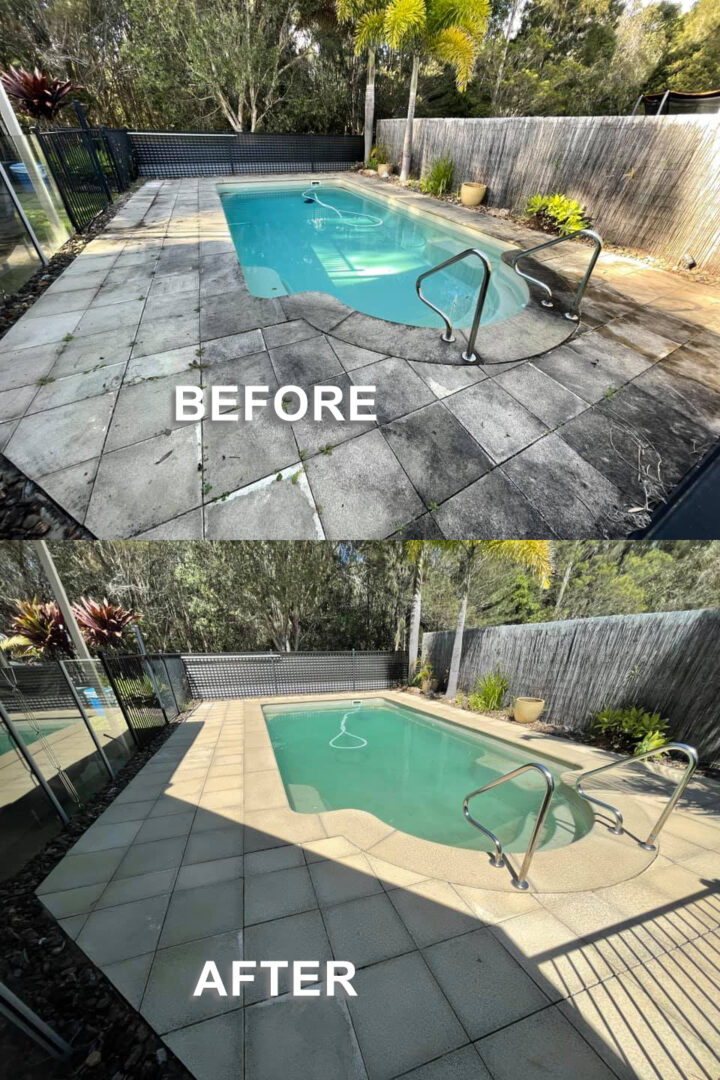
Mould can be a common issue on pavers, especially in damp or shaded areas where moisture accumulates. Removing mould promptly not only improves the appearance of your outdoor spaces but also prevents it from spreading and potentially causing damage to the pavers. Here’s a comprehensive guide on how to effectively remove mould from pavers:

  1. Safety Precautions:
  • Before starting, wear gloves, safety goggles, and a mask to protect yourself from mould spores and cleaning solutions.
  • Work in a well-ventilated area to minimize exposure to fumes from cleaning products.
  1. Cleaning Supplies:
  • Water: Start with plain water to rinse off loose mould and debris from the pavers.
  • Household Cleaner: Use a mild household detergent or soap mixed with water for light mould stains. Apply the solution directly to the affected areas.
  • Chlorine: For stubborn mould stains, mix one part pool chlorine with three parts water. Ensure the area is well-ventilated and avoid using chlorine on coloured or delicate pavers as it may cause discoloration.
  • Bleach Solution: For stubborn mould stains, mix one part household bleach with three parts water. Ensure the area is well-ventilated and avoid using bleach on coloured or delicate pavers as it may cause discoloration.
  • BC36: a chemical used to remove stains from pavers.
  1. Steps to Remove Mould:
  • Preparation: Sweep or brush off loose dirt and debris from the pavers.
  • Apply Cleaning Solution: Spray or apply the chosen cleaning solution generously over the mouldy areas. Allow it to sit for 10-15 minutes to penetrate the mould.
  • Scrubbing: Use a stiff brush or scrubbing pad to agitate the mould and lift it from the paver surface. Work in circular motions to effectively remove mould from crevices and joints.
  • Rinse Thoroughly: This is very important – rinse the pavers thoroughly with clean water to remove all traces of mould, detergent, or bleach solution. Use a hose or bucket of water for rinsing.
  1. Alternative Cleaning Methods:
  • Vinegar Solution: Create a solution of equal parts white vinegar and water. Apply to mouldy areas, let sit for 15-20 minutes, scrub with a brush, and rinse thoroughly.
  • Baking Soda Paste: Make a paste of baking soda and water. Apply to mouldy spots, scrub gently with a brush, and rinse off with water.
  1. Preventing Future Mould Growth:
  • Improve Drainage: Ensure proper drainage around pavers to minimize water pooling and moisture accumulation.
  • Trim Plants: Trim back overhanging vegetation to reduce shade and improve air circulation around paver surfaces.
  • Seal Pavers: Consider applying a sealant specifically formulated for pavers. Sealing helps protect against moisture penetration and reduces the likelihood of mould growth.
  1. Regular Maintenance:
  • Inspect Regularly: Check pavers periodically for signs of mould or mildew growth, especially in shaded or damp areas.
  • Prompt Action: Address mould promptly as soon as you notice it to prevent it from spreading and becoming more difficult to remove.
  1. Professional Help:
  • Persistent Mould: If mould persists despite cleaning efforts, consider consulting a professional cleaning service or paver maintenance expert.
  • Specialised Products: Some companies offer mould and mildew cleaners specifically formulated for use on outdoor surfaces, including pavers.
  1. Environmental Considerations:
  • Dispose of Cleaning Waste: Dispose of cleaning solution and rinse water responsibly to prevent environmental contamination. Avoid letting cleaning products enter storm drains.

By following these steps and techniques, you can effectively remove mould from your pavers and maintain a clean and attractive outdoor space. Regular cleaning and preventive measures help prolong the life of your pavers and ensure they continue to enhance your home’s curb appeal for years to come.
Caring for Your Pavers: Essential Maintenance Tips

Pavers are a versatile and durable choice for enhancing outdoor spaces, whether used for patios, walkways, or driveways. Proper maintenance ensures their longevity, appearance, and functionality over time. Here’s a comprehensive guide on how to care for your pavers to keep them looking beautiful and structurally sound:

1. Regular Cleaning:

  • Sweeping: Keep pavers free of debris, leaves, and dirt by regularly sweeping with a broom or using a leaf blower. This prevents organic matter from settling into joints and causing weed growth.
  • Pressure Washing: Periodically use a pressure washer (set to a low-medium setting) to clean pavers and remove stubborn dirt, stains, or moss. Avoid excessive pressure, which can damage the surface.

2. Weed Control:

  • Weed Prevention: Apply a polymeric sand or jointing compound to paver joints after installation to inhibit weed growth and prevent erosion. These products help stabilize joints and minimize maintenance.
  • Regular Inspection: Monitor joints for signs of weed growth or moss buildup. Remove weeds manually or use an appropriate herbicide, following manufacturer instructions carefully.

3. Stain Removal:

  • Oil and Grease Stains: Immediately absorb excess oil or grease with a cloth or paper towels. Use a degreasing agent or detergent specifically formulated for pavers to clean the affected area.
  • Organic Stains: Treat stains from leaves, berries, or mildew promptly with a mixture of water and mild soap. Scrub gently with a brush and rinse thoroughly with water.

4. Sealing:

  • Purpose: Consider sealing your pavers to enhance color, protect against stains, and minimize weed growth. Sealing can also help prolong the life of your pavers by providing a protective barrier.
  • Frequency: Follow manufacturer recommendations for sealing frequency, typically every 2-5 years depending on the type of pavers, exposure to elements, and wear and tear.

5. Repair and Maintenance:

  • Replacing Damaged Pavers: Inspect pavers regularly for cracks, chips, or uneven settling. Replace damaged pavers promptly to prevent tripping hazards and maintain a uniform appearance.
  • Re-Leveling: Over time, pavers may settle unevenly. Lift and re-level sunken pavers by adding or removing bedding sand as needed to ensure a flat surface.

6. Winter Care:

  • Snow and Ice Removal: Use plastic shovels or snow blowers with plastic blades to remove snow and ice from pavers. Avoid metal blades, which can scratch and damage the surface.
  • De-Icing Agents: Choose de-icing products specifically recommended for pavers to prevent damage from chemicals. Alternatively, use sand or kitty litter for traction on icy surfaces.

7. Avoiding Damage:

  • Heavy Loads: Avoid driving vehicles or heavy equipment directly on pavers unless they are designed for such use. Use protective mats under vehicle tires or consider installing reinforced pavers for driveways.
  • Sharp Objects: Refrain from using sharp tools or equipment that could scratch or chip pavers. Handle furniture and heavy objects with care to prevent damage during placement.

8. Professional Maintenance:

  • Annual Inspection: Consider scheduling an annual maintenance check by a professional landscaper or paver installer. They can assess the condition of your pavers, recommend repairs, and perform necessary sealing or re-leveling.

9. Proper Drainage:

  • Grading and Slope: Ensure proper drainage away from paver surfaces to prevent water pooling or erosion. Maintain gutters and downspouts to direct water away from paved areas.

10. Educate Yourself:

  • Read Manufacturer Guidelines: Refer to manufacturer guidelines and warranty information for specific care instructions tailored to your type of pavers. Follow recommended maintenance practices to uphold warranty coverage.

By following these maintenance tips and incorporating regular care into your routine, you can ensure that your pavers remain attractive, functional, and safe for years to come. With proactive care and attention, your outdoor paver surfaces will continue to enhance your home’s aesthetic appeal and provide enjoyable outdoor living spaces for relaxation and entertainment.

Choosing the Right Pavers for Your Backyard Project: A Comprehensive Guide

Selecting the ideal pavers for your backyard project involves considering various factors such as aesthetics, functionality, durability, and maintenance requirements. Whether you’re planning a patio, pathway, or driveway, here’s a detailed guide to help you make an informed decision:

1. Determine Your Project Needs:

  • Purpose: Define the intended use of the paver area—whether it’s for outdoor dining, lounging, pathways, or vehicle access.
  • Size and Shape: Consider the dimensions and layout of the space where pavers will be installed to determine the quantity and configuration needed.

2. Choose the Right Material:

  • Concrete Pavers: Available in various colors, shapes, and sizes, concrete pavers are versatile and durable. They can mimic natural stone or brick and are generally cost-effective.
  • Natural Stone: Options like granite, limestone, slate, and sandstone offer unique textures and natural colors. They are durable but may require sealing and tend to be more expensive.
  • Brick: Traditional and classic, brick pavers provide a timeless appeal. They are durable and can withstand heavy use but may fade over time and require occasional maintenance.
  • Composite or Rubber Pavers: Eco-friendly options made from recycled materials, these pavers are lightweight, easy to install, and offer good traction. They are ideal for areas where flexibility and environmental impact are priorities.

3. Consider Aesthetic Appeal:

  • Color: Choose pavers that complement the overall theme and colors of your home and landscaping. Lighter colors can make small spaces appear larger, while darker colors add warmth and hide dirt.
  • Texture: Textured pavers provide grip and can prevent slipping, making them suitable for pool decks or wet areas. Smooth surfaces are easier to clean but may be slippery when wet.

4. Evaluate Durability and Maintenance:

  • Strength: Ensure the pavers can withstand the expected load and foot traffic. Check the manufacturer’s specifications for compression strength and durability ratings.
  • Resistance to Elements: Consider how well the pavers resist fading, staining, and weathering, especially in your climate (e.g., freeze-thaw cycles, intense sunlight).
  • Maintenance Requirements: Some materials require regular sealing, cleaning, or re-leveling of sand or gravel joints. Choose pavers that align with your desired level of maintenance.

5. Installation Method and Cost:

  • DIY vs. Professional Installation: Assess your skill level and the complexity of the project. Some pavers are easier to install than others, while intricate patterns may require professional expertise.
  • Cost Considerations: Compare the initial cost of pavers, installation materials, and labor if hiring professionals. Factor in long-term maintenance and durability to determine overall value.

6. Eco-Friendly Options:

  • Permeable Pavers: Designed to allow water to infiltrate through the joints, permeable pavers help reduce stormwater runoff and can recharge groundwater tables. They are ideal for eco-conscious projects.

7. Seek Expert Advice:

  • Consult with Suppliers: Visit local suppliers or showrooms to see pavers firsthand and get expert advice on suitable options for your specific project requirements.
  • Professional Landscapers: Consider consulting with landscape professionals who can provide design ideas, material recommendations, and installation services tailored to your needs.

8. Plan for Long-Term Use:

  • Future Expansion: Anticipate future needs and plan for potential expansion or changes in landscaping that may affect the paver area.
  • Warranty and Guarantees: Review manufacturer warranties and guarantees to understand coverage for defects and performance expectations.

By carefully evaluating these considerations and choosing pavers that align with your project goals, style preferences, and maintenance capabilities, you can create a beautiful and functional outdoor space that enhances the appeal and value of your home. Whether you prioritize durability, aesthetic appeal, or environmental impact, selecting the right pavers ensures a successful and satisfying backyard project.

Enhancing Your Backyard Garden: Tips for Maximum Enjoyment

Transforming your backyard garden into a haven of relaxation and beauty can greatly enrich your outdoor living experience. Whether you’re a seasoned gardener or just starting out, here are practical tips to make your backyard garden more enjoyable:

1. Create Comfortable Outdoor Spaces:

  • Seating Areas: Incorporate comfortable seating such as benches, lounge chairs, or a cozy outdoor dining set where you can relax and unwind.
  • Shade: Install umbrellas, pergolas, or shade sails to provide relief from the sun during hot days, making your garden usable throughout the day.

2. Design with Aesthetics in Mind:

  • Plant Selection: Choose a variety of plants with different colors, textures, and heights to create visual interest and appeal throughout the seasons.
  • Paths and Walkways: Define pathways with materials like pavers, gravel, stepping stones, or bricks to guide visitors through your garden and create a sense of discovery. having a nice paved pathway leading to a particular area, adds to the aesthetics of your garden.

3. Incorporate Water Features:

  • Fountains or Waterfalls: Install a fountain, waterfall, or small pond to add soothing sounds and attract wildlife like birds and butterflies.
  • Reflective Surfaces: Integrate mirrors or reflective ornaments strategically to create the illusion of more space and light in smaller gardens.

4. Add Garden Art and Décor:

  • Sculptures or Statues: Place sculptures, statues, or garden gnomes among your plants to add whimsy and personal style.
  • Outdoor Lighting: Illuminate pathways, trees, or focal points with solar-powered or low-voltage LED lights for ambiance and safety during evening hours.

5. Grow Edibles and Herbs:

  • Kitchen Garden: Incorporate raised beds or containers for growing vegetables, herbs, and fruits that can be harvested and enjoyed fresh from your garden.
  • Pollinator Plants: Include flowers like lavender, marigolds, and sunflowers to attract bees and butterflies, enhancing biodiversity and beauty.

6. Create a Relaxing Atmosphere:

  • Fragrant Plants: Plant fragrant flowers and herbs like roses, lavender, and mint to add delightful scents to your garden.
  • Wind Chimes or Wind Spinners: Hang wind chimes or spinners to create gentle melodies and movement with the breeze, enhancing a tranquil ambiance.

7. Encourage Wildlife:

  • Bird Feeders and Baths: Install bird feeders and birdbaths to attract a variety of bird species, providing entertainment and contributing to ecosystem health.
  • Butterfly Gardens: Plant host and nectar plants like milkweed and butterfly bush to attract butterflies, adding vibrant colors and life to your garden.

8. Maintain a Functional Garden:

  • Organized Storage: Keep gardening tools, pots, and supplies neatly organized in a shed or designated area to streamline gardening tasks.
  • Regular Maintenance: Schedule regular weeding, pruning, and watering sessions to keep your garden looking tidy and healthy throughout the year.

9. Personalize Your Space:

  • Garden Bench or Swing: Place a bench or swing under a tree or in a quiet corner where you can read, meditate, or simply enjoy the beauty of your surroundings.
  • Outdoor Art or Personal Touches: Display personal mementos, artwork, or handmade crafts that reflect your personality and create a sense of belonging in your garden.

10. Enjoy the Seasons:

  • Seasonal Plantings: Embrace seasonal changes by planting bulbs for spring blooms, annuals for summer color, and evergreens or ornamental grasses for winter interest.
  • Outdoor Entertaining: Host gatherings, barbecues, or picnics in your garden to share its beauty and bounty with friends and family throughout the year.

By incorporating these tips and personal touches, you can transform your backyard garden into a serene retreat that brings joy, relaxation, and connection with nature. Whether you seek solitude, entertainment, or a space to cultivate your green thumb, enhancing your garden’s appeal will undoubtedly enrich your outdoor living experience.

Keeping Your Greenhouse Warm in Winter: Essential Tips and Techniques

As winter approaches and temperatures drop, maintaining a suitable environment in your greenhouse becomes crucial for the health and growth of your plants. Unlike outdoor gardens, greenhouses provide a controlled climate, but they require proactive measures to keep plants thriving through the colder months. Here are essential tips and techniques to effectively keep your greenhouse warm during winter:

1. Insulate Your Greenhouse:

  • Bubble Wrap or Polyethylene Film: Covering the greenhouse glazing with bubble wrap or polyethylene film can provide an additional layer of insulation. These materials help trap heat inside while still allowing sunlight to penetrate.
  • Insulating Panels: Installing insulating panels or curtains on the inside of the greenhouse can further reduce heat loss during cold nights.

2. Use Thermal Mass:

  • Thermal Mass Materials: Incorporate thermal mass materials like water barrels, bricks, or concrete blocks inside your greenhouse. These materials absorb heat during the day and release it slowly at night, helping to stabilize temperatures.
  • Raised Beds: Planting in raised beds filled with soil or compost can act as natural thermal mass, moderating temperature fluctuations around plant roots.

3. Install a Heating System:

  • Electric Heaters: Electric heaters are a common choice for small to medium-sized greenhouses. They provide consistent heat and can be controlled with thermostats to maintain optimal temperatures.
  • Propane or Gas Heaters: Larger greenhouses may benefit from propane or gas heaters, which are more powerful and efficient for heating larger spaces. Ensure proper ventilation to prevent buildup of harmful gases.

4. Optimize Solar Gain:

  • South-Facing Orientation: Position your greenhouse with a south-facing orientation to maximize exposure to sunlight during the winter months. This allows the greenhouse to capture more solar heat during the day.
  • Clean Glazing: Keep greenhouse glazing clean to maximize light transmission. Dirt and debris can reduce the amount of sunlight entering the greenhouse, impacting heating efficiency.

5. Use Thermal Curtains or Covers:

  • Thermal Blankets or Row Covers: Covering plants with thermal blankets or row covers during cold nights can provide extra protection against frost and temperature fluctuations.
  • Thermal Curtains: Install thermal curtains that can be drawn at night to reduce heat loss and create a more insulated environment.

6. Monitor and Adjust:

  • Thermometers and Hygrometers: Place thermometers and hygrometers inside the greenhouse to monitor temperature and humidity levels. This allows you to make informed adjustments to your heating and ventilation systems.
  • Automatic Ventilation and Heating Controls: Consider investing in automatic systems that adjust heating and ventilation based on preset temperature thresholds. This helps maintain a stable and optimal environment for your plants.

7. Ventilation Management:

  • Daytime Ventilation: Proper ventilation during the day helps regulate temperature and humidity levels inside the greenhouse. Install vents or louvers that can be opened to release excess heat.
  • Nighttime Ventilation: Close vents or use insulated covers at night to prevent heat loss while still ensuring adequate airflow to prevent humidity buildup.

8. Consider Alternative Heat Sources:

  • Compost Heating: Utilize a compost heap or pit inside the greenhouse, which generates heat as organic matter decomposes. This can provide a sustainable and cost-effective heat source.
  • Geothermal Heating: In regions with stable underground temperatures, consider installing a geothermal heating system to regulate greenhouse temperatures year-round.

By implementing these tips and techniques, you can create a warm and nurturing environment for your plants throughout the winter season. Remember to monitor conditions regularly and make adjustments as needed to ensure optimal growth and health for your greenhouse plants. With proper care and attention, your greenhouse can thrive as a vibrant oasis even in the coldest months of the year.

Planting a Vegetable Garden: A Guide for Everyone

Growing your own vegetables is not only rewarding but also a sustainable way to enjoy fresh produce right from your backyard or even a small balcony. Whether you’re a seasoned gardener or a complete novice, starting a vegetable garden is an accessible and fulfilling endeavor. Here’s a comprehensive guide to help you get started:

1. Choose a Suitable Location:

  • Sunlight: Select a spot that receives at least 6-8 hours of direct sunlight daily. Most vegetables thrive in full sun.
  • Space: Consider the size of your garden space or containers. Even small areas can accommodate vegetables with proper planning.

2. Prepare the Soil:

  • Soil Quality: Ensure your soil is well-draining, nutrient-rich, and loose. Amend soil with compost or organic matter to improve fertility.
  • pH Level: Test soil pH and adjust if necessary. Most vegetables prefer a slightly acidic to neutral pH (around 6.0-7.0).

3. Choose What to Grow:

  • Beginner-Friendly Vegetables: Start with easy-to-grow vegetables like tomatoes, lettuce, radishes, carrots, and herbs such as basil and parsley.
  • Consider Your Climate: Select vegetables that thrive in your region’s climate and growing season.

4. Plan Your Garden Layout:

  • Spacing: Follow spacing recommendations on seed packets or plant tags to ensure proper growth and airflow.
  • Companion Planting: Group plants that benefit each other, such as planting marigolds to deter pests or beans near corn for mutual support.

5. Start Seeds or Buy Seedlings:

  • Seed Starting: Start seeds indoors several weeks before the last frost date or directly sow seeds into prepared garden beds or containers.
  • Seedlings: Purchase healthy seedlings from nurseries or garden centers if you prefer to skip seed starting.

6. Planting Techniques:

  • Depth and Spacing: Plant seeds at the recommended depth and space seedlings according to their mature size.
  • Watering: Water newly planted seeds and seedlings gently and consistently to keep soil evenly moist until established.

7. Provide Care and Maintenance:

  • Watering: Water deeply and regularly, especially during dry spells. Use mulch to conserve moisture and suppress weeds.
  • Fertilizing: Feed plants with balanced fertilizer or compost tea throughout the growing season, following package instructions.

8. Pest and Disease Management:

  • Monitor Regularly: Inspect plants for signs of pests or disease. Remove affected leaves or treat with organic methods such as neem oil or companion planting.
  • Crop Rotation: Rotate crops annually to prevent soil-borne diseases and maintain soil fertility.

9. Harvesting and Enjoying Your Produce:

  • Timing: Harvest vegetables at peak ripeness for best flavor and nutrition. Refer to specific harvest times for each crop.
  • Storage: Store harvested vegetables properly in a cool, dry place or preserve them through canning, freezing, or drying.

10. Continuous Learning and Enjoyment:

  • Gardening Resources: Explore gardening books, online resources, and local gardening clubs for ongoing learning and support.
  • Share and Enjoy: Share your bounty with family and friends, and savor the satisfaction of growing your own nutritious and delicious vegetables.

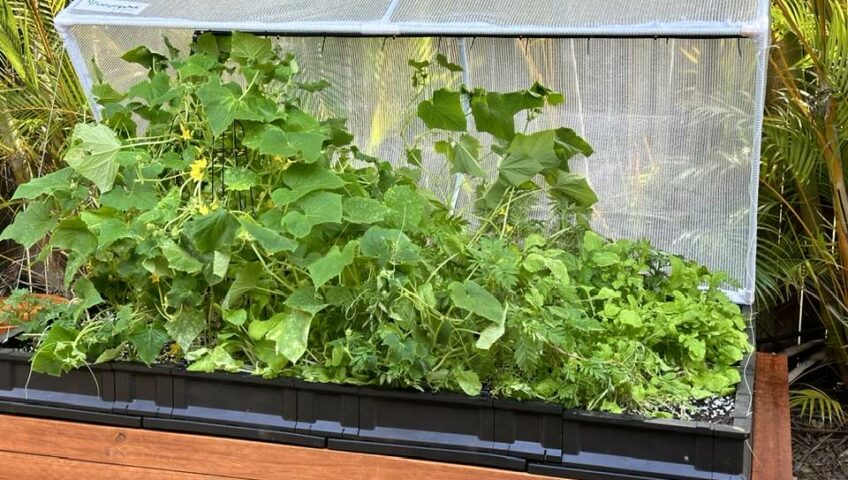
Consider using a vegepod (as pictured), they are great to use. Starting a vegetable garden is a fulfilling journey that connects you with nature and provides healthy, homegrown food. With proper planning, care, and a bit of patience, everyone can experience the joys of cultivating their own garden oasis, no matter their level of gardening experience.